Tutorial: Create your first media wall
Set up your event
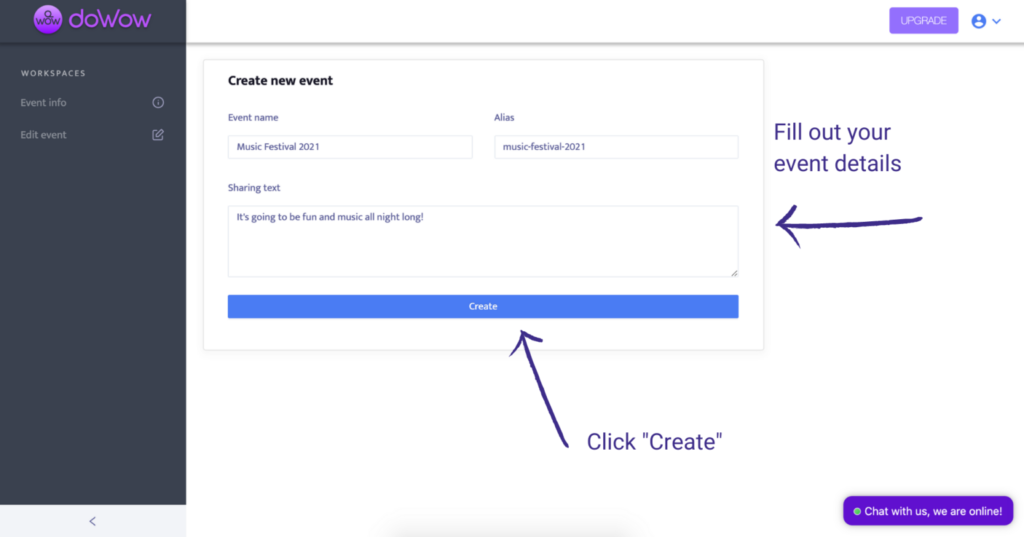
Once you logged in your doWow account, you will be able to instantly create a new event:
- Click “New Event”
- Create a unique name and add sharing text. Both can be edited or updated later.
- Now click on “Create”
- Click “Event info” to add a custom icon (.png, .ico) or poster graphic (.png,.jpg)
Events are projects you organize according to your activities. Whether you are organizing a large conference or hosting a weekly webinar, all your events can be easily managed. doWow allows you to create as many events as you wish on all subscription plans. Each event can also host an unlimited number of media walls.
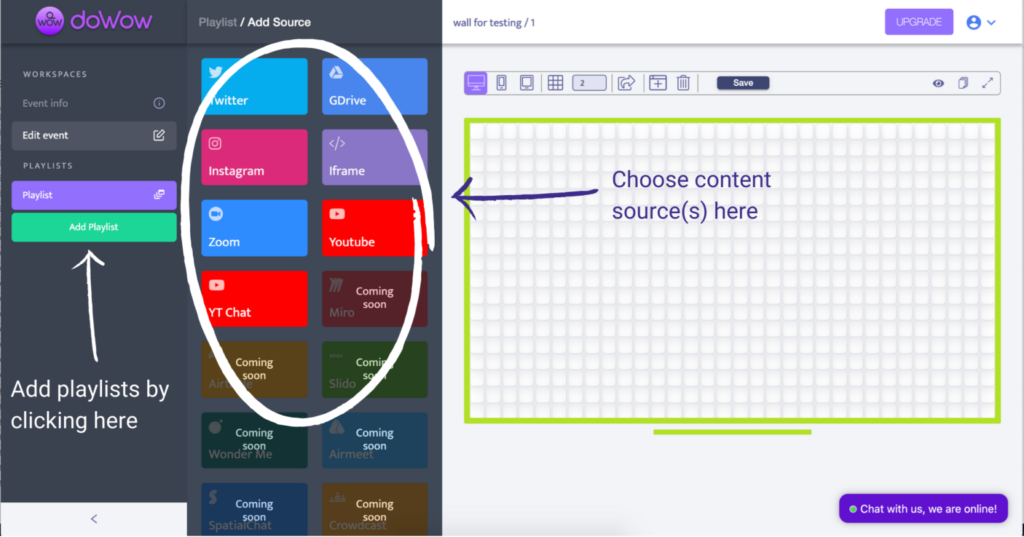
Add your first playlist
The next step is to create your first playlist. The playlist can be used to host a variety of content sources and can be added to your media wall. Please note that your subscription plan limits the number of playlists you can create.
- Your first playlist is available after creating an event
- You can add additional playlists by clicking on the green button in the left sidebar menu.
- Add sources as desired by adding an additional playlist
Adding content to the playlist
Depending on your preference, playlists can contain content from different sources, such as Twitter or Instagram feeds, GoogleDrive visuals, Zoom meetings or webinars, YouTube videos (including live) or YouTube chat. Additionally, you have the ability to add iframes with our Pro plan. Moreover, doWow is compatible with Miro boards, Spatial Chat, Slido, Typeform, and more!
- Select “Source” from the left-side panel
- Add source by clicking on one of the icons
- Find the content by using the search bar
- Click on the + button to add content to the playlist
- Choose filters if available: for instance, you can choose to only see images or videos when selecting Twitter posts
- By clicking on the “Tag” icon, you can create a shortcut for future searches
- Click back to the playlist area top left of the search bar.
- Manage selected content as desired – by default, all content you selected will be active in the playlist. Press on + to “unselect”. In this way, items will remain on the playlist but will not be played until you press on + again.
How to add more than one source to a playlist
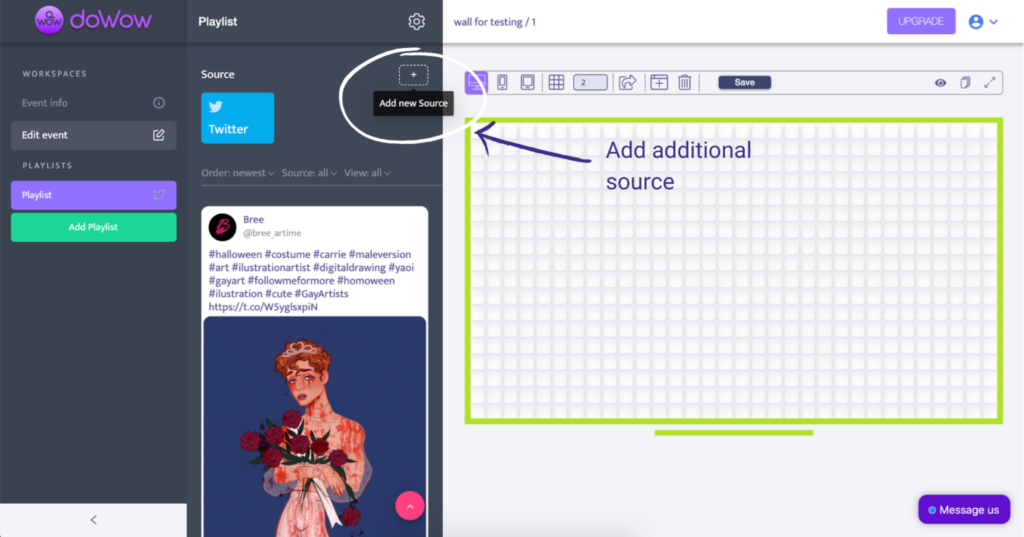
It is possible to add more than one source to a playlist. For example, if you would like to mix Twitter feed with photos, you can add GoogleDrive and Twitter as sources to your playlist.
- Choose the playlist
- Select “Add new source” at the top right corner of the left side panel
- Choose an additional source
- Select & add content from the additional source to your playlist
How to add Twitter feed
To add Twitter posts to your playlist:
- Choose Twitter as a content source
- Type a specific hashtag you’re looking for in the search bar (alternatively, you can search for Twitter content without using hashtag)
- Filter your search by choosing to see retweets, images or videos only
- Choose Twitter posts and add them to your playlist by clicking on +
- Moderate your playlist items using +
How to add GoogleDrive
To connect your GoogleDrive and add content, follow these steps:
- Choose GoogleDrive as a content source
- Click on “Connect google app”
- Give permissions to doWow app
- Once connected you can search folders or visual items using the search bar
- You can save a path to folders by clicking on the “Tag” icon
- Choose visuals and add them to your playlist by clicking on +
- Moderate content using +
How to add YouTube & YouTube Chat
Go live on YouTube and integrate both videos and chats:
- Choose YouTube as a content source
- Copy your YouTube video URL and paste it in the search bar
- Add the video to your playlist by clicking +
- To embed YouTube Chat, choose YT Chat as a content source
- Copy the same URL of your YouTube live video and paste it in the search bar
- Add your chat to the playlist by clicking +
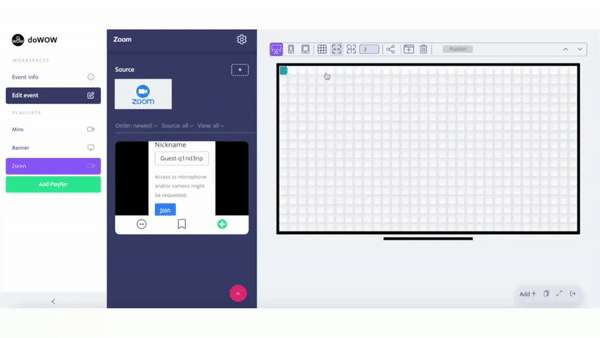
How to add Zoom meetings
doWow allows you to quickly integrate Zoom meetings and webinars and run them on your website.
To integrate Zoom:
- Choose Zoom as a content source
- Copy your Zoom meeting link and paste it into the search bar
- Add your meeting to the playlist by clicking on +
You can choose to let attendees join anytime or opt for a waiting room via Zoom settings. Please be aware that Zoom integration is not available for mobile versions of your media walls – you can always insert a hyperlink leading to your Zoom meeting behind the respective tile on your mobile media wall.
How to integrate iframes
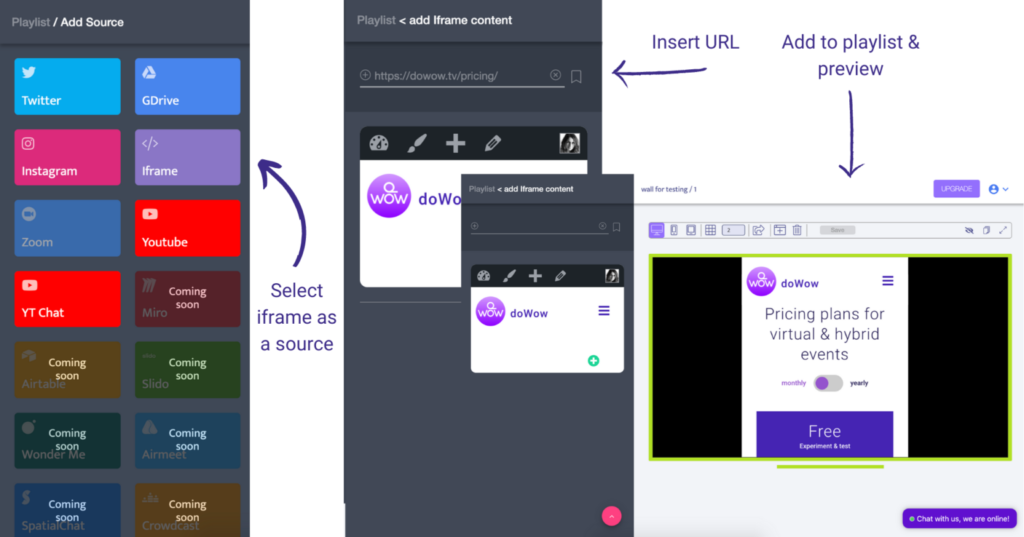
Use our iframe feature to enhance your events if you are subscribed to our Pro or Business plans.
You can integrate forms, games, web pages & more – please ensure that the content you are integrating allows iframes.
- Choose iframe as a content source
- Copy the URL of the content
- Paste the URL into the search bar
- Add to your playlist by clicking on +
Live moderation & managing content in playlists
Among the most interesting features of the doWow tool is the ability to moderate the content you play out on your media walls without requiring your users to refresh their browser.
- Select or deselect content in the list as desired by toggling the + (bottom right of the content panel). The content will be displayed once the + button becomes green
- Switch between content items – the changes will appear on the media wall instantly
- If you wish, you can choose to play several content items at a set interval or only one at a time
- Remove content by hovering on the trash can (the top right of the content panel)
- Add URL to your content by clicking on the megaphone icon (location the top right of the content panel)
Manage playlist settings
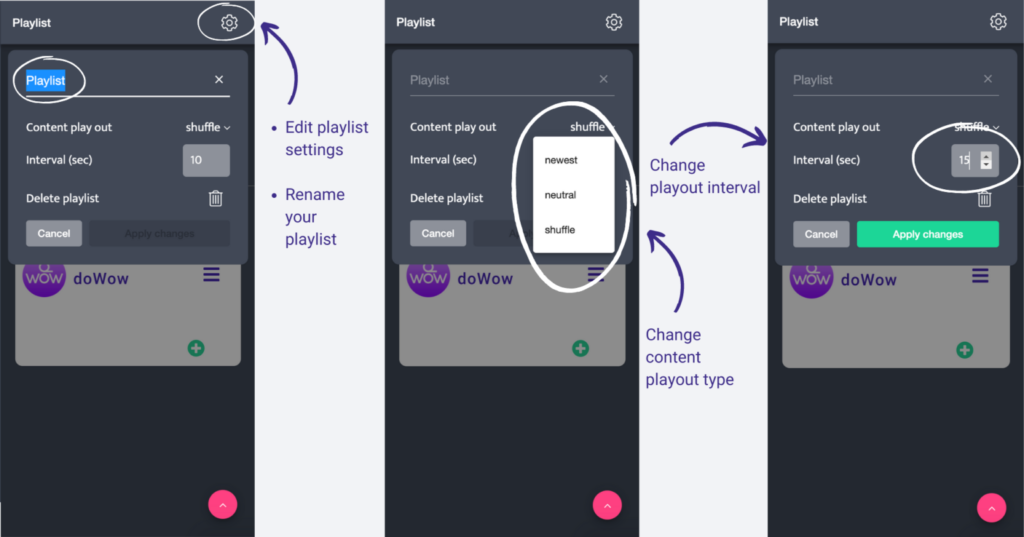
The playlist settings allow you to modify the name, content playout type, and interval, or to delete your playlist.
- Click on the “wheel” icon at the top right corner of the left-side panel
- Change your playlist name
- Select content playout type (shuffle, newest items first, or neutral)
- Choose playlist timing (interval in seconds)
- Delete playlist
- Select “cancel” or “save” to return to the panel
Create your media wall layout
Create your media wall layout on the right-side panel. For your media wall, you can choose to set up desktop, mobile, and/or tablet versions. Simply by drawing tiles, you can set up your pop-up event webpage in seconds!
- Choose desktop, tablet or mobile view
- Click on one of the squares and drag the mouse along. Once you are satisfied with the selected area, click again. You have created a tile!
- You can always remove a tile by clicking on the “-“ icon located at the top right corner of the tile
- Selecting more squares around the tile and dragging the mouse over it will allow you to adjust its size
sum dolor sit amet, consectetur adipiscing elit. Ut elit tellus, luctus nec ullamcorper mattis, pulvinar dapibus leo.
Add playlists to the media wall
When your media wall layout is complete, it is time to add your playlists:
- Select a playlist on the left-side panel
- And then click on the tile to which you would like to add your playlist
- If you wish to add one playlist to several tiles, follow the same procedure
- Click on the preview button at the top right corner above the media wall to see the result
Manage tile behavior and calls-to-action
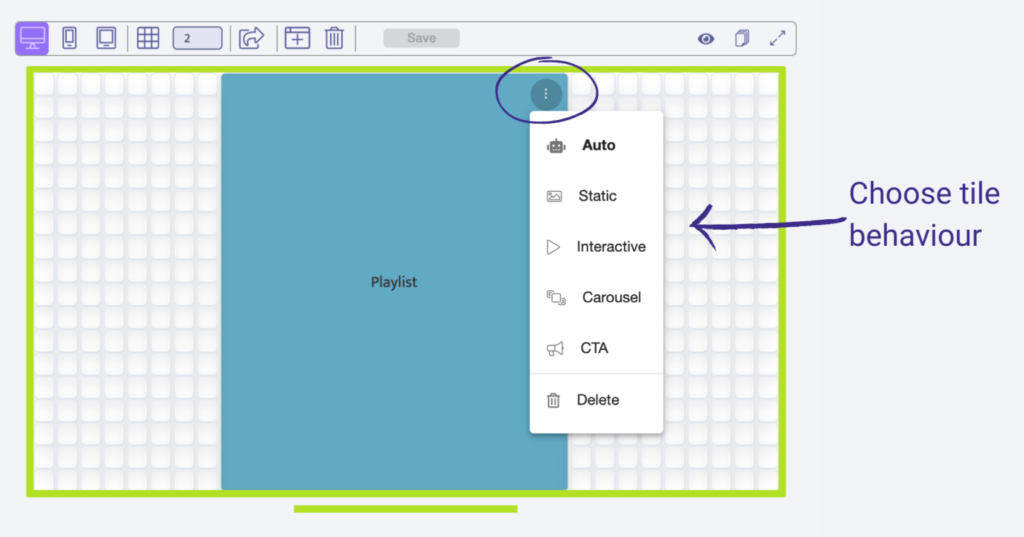
Any tile on your media wall can be customized to include a call to action, a hyperlink, a carousel, or set to autoplay. Click on the three vertical dots (ellipses) at the top right corner of a tile and select one of the following options:
- Auto – default mode that adapts to the type of content you place in the tile (if it is an image then, by default, it will be possible to expand it by clicking on it);
- Static – apply this mode if you don’t want the content to be clickable or expanded
- Interactive – apply this mode to set your videos to autoplay (and mute) once the viewer accesses your media wall
- Carousel – you can place several images to playout in one tile, when a viewer clicks on the tile, they will be able to thumb through the images;
- CTA – this feature allows you to add a call-to-action to your tile. Manage call to action by adding a URL, choosing whether it is going to open in the same or new tab, or adding a button.
Share and embed your media wall
A unique URL and embed code are assigned to each wall you create – you can share the link with your audience so they have immediate access to your media wall or embed it on an external website to drive traffic to it.
- Click on the share icon on the menu above the media wall
- Change the URL slug if desired
- Copy the URL & share it
To embed your media wall on a webpage:
- Click on the share icon on the menu above the media wall
- Select embed
- Copy the embed code
- Paste the embed code into the HTML block on your website